はじめに
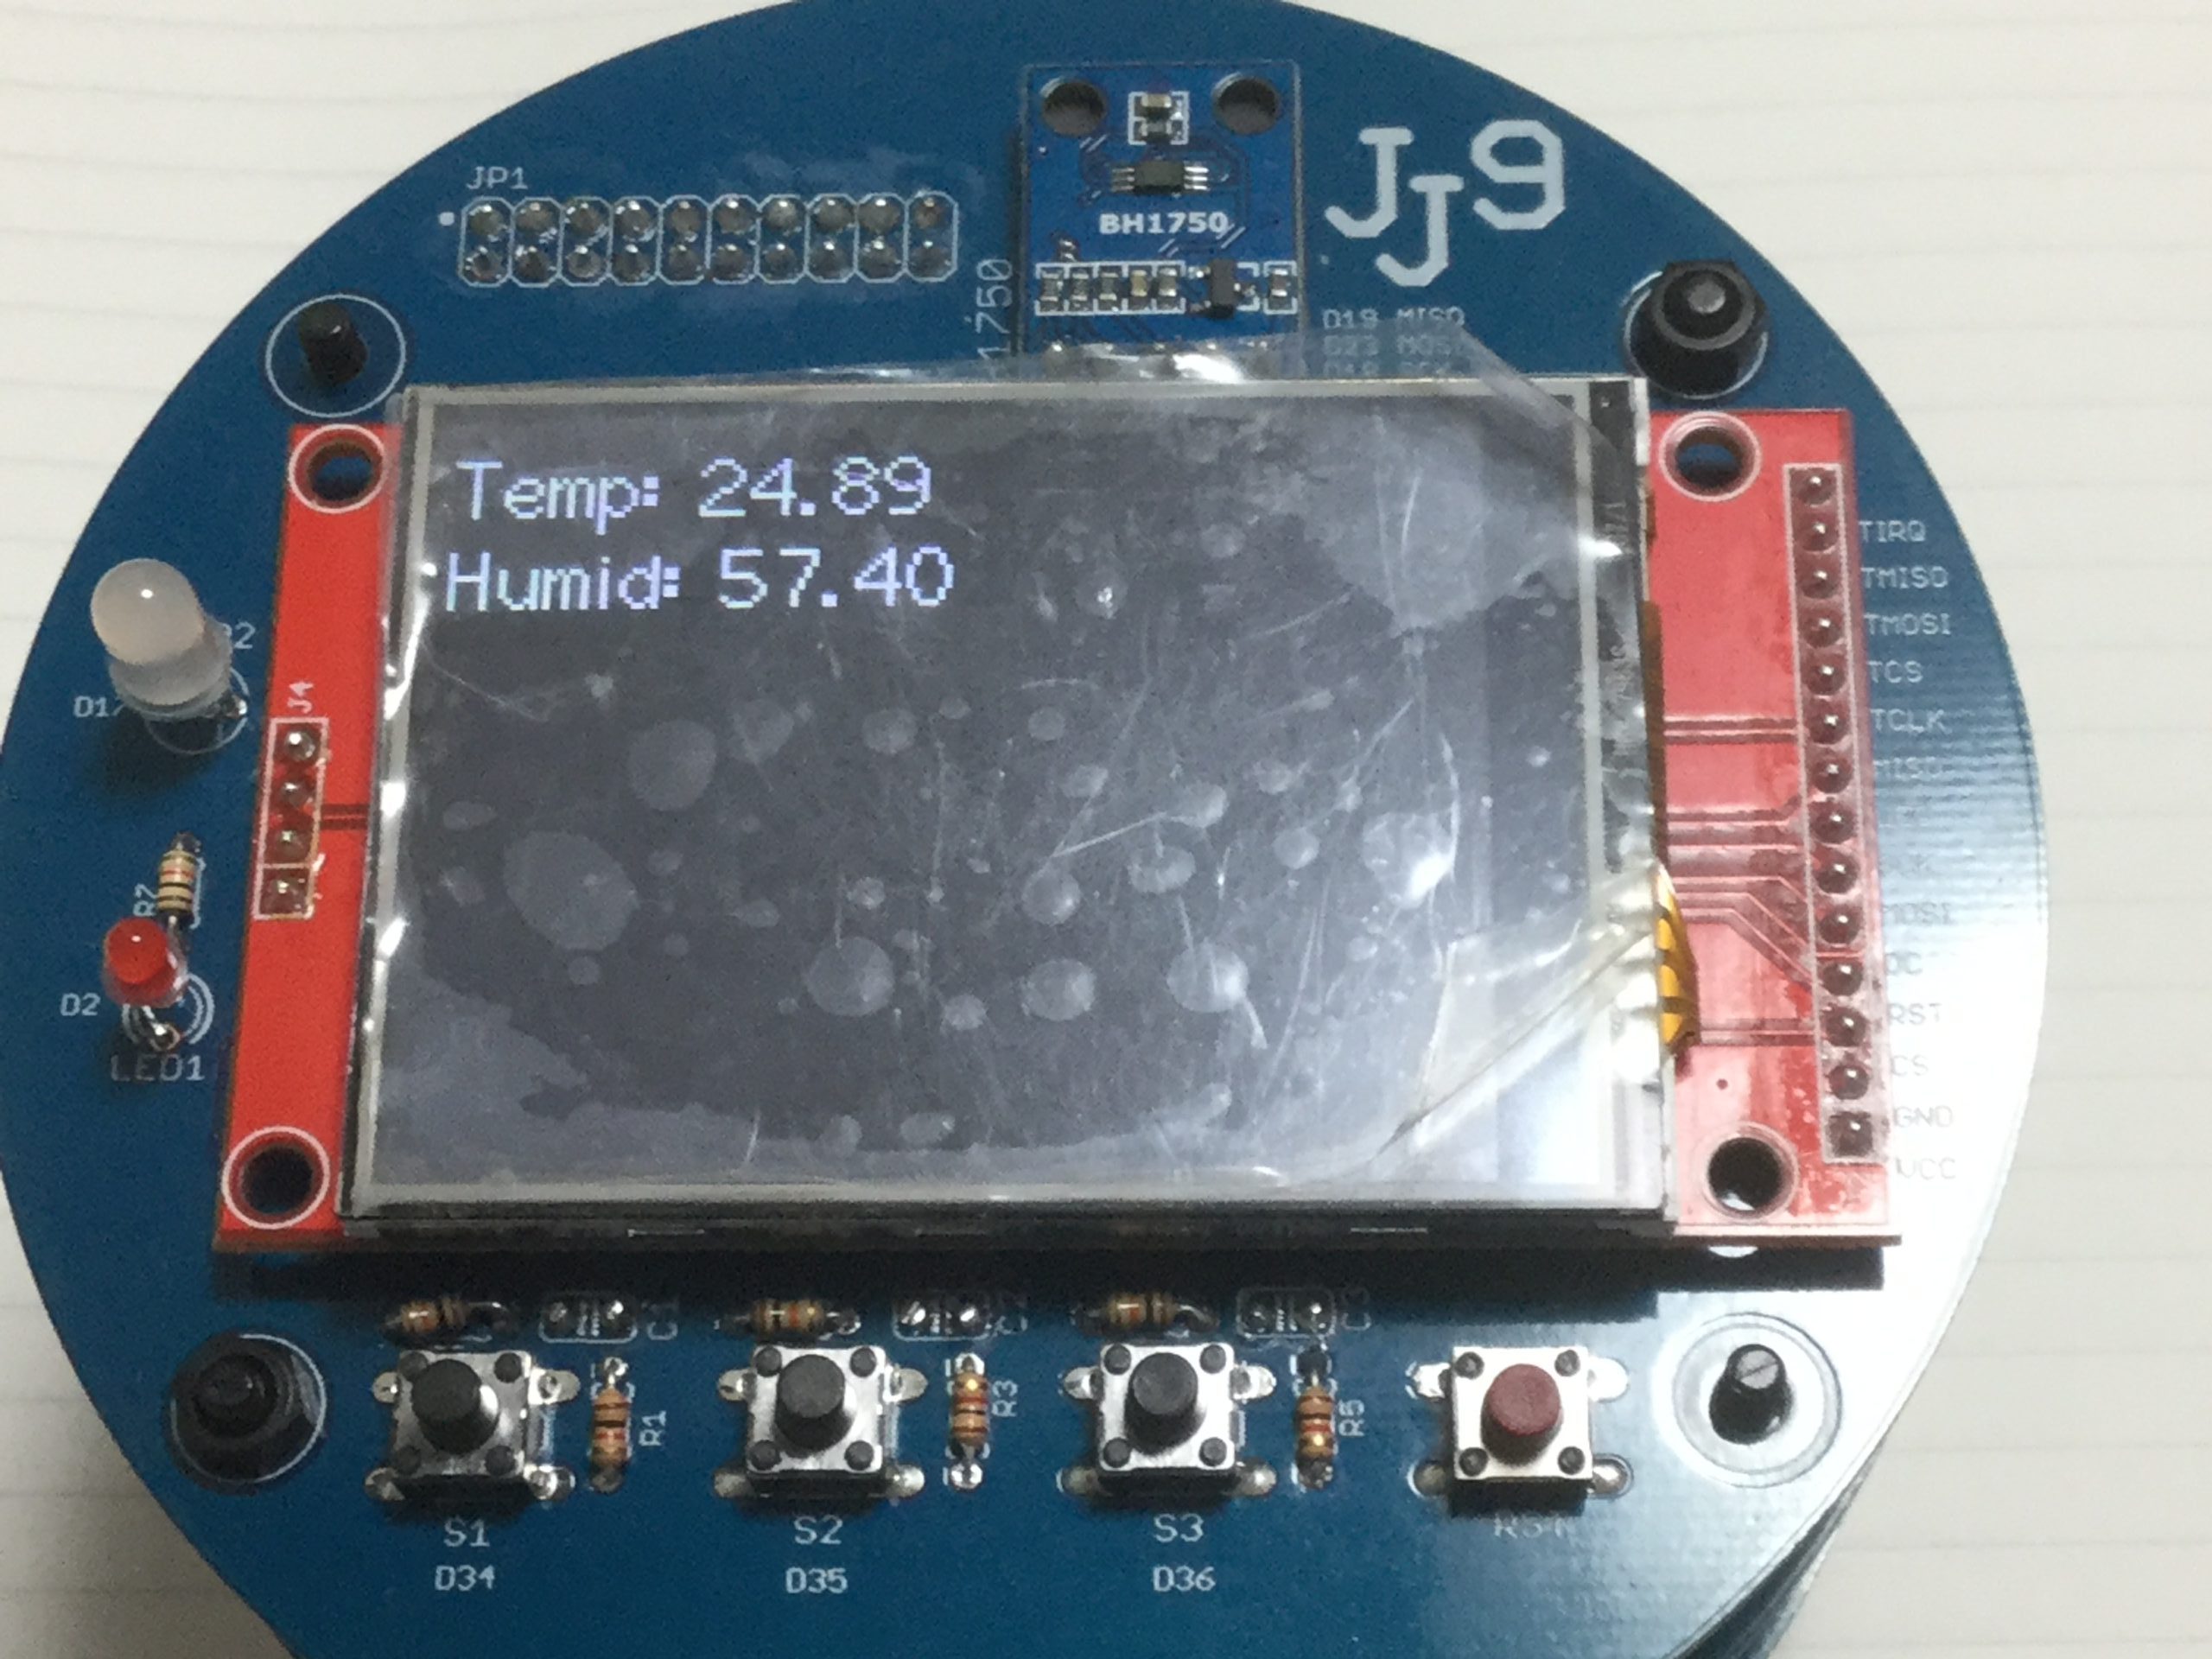
2021年度公開講座では,タッチパネル付きの液晶ディスプレイとSDカードを使用します。
液晶ディスプレイ(タッチパネル付き),SDカード
・液晶ディスプレイ2.4インチ:ILI9341
・タッチパネルコントローラ:XPT2048(液晶ディスプレイに付属)
・SDカード:Micro SDカード / SDカードスロット
配線
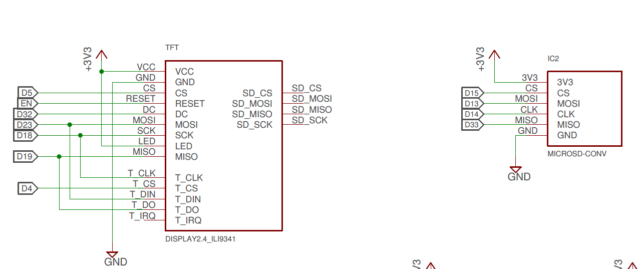
ESP32と液晶ディスプレイ・タッチパネル,さらに,マイクロSDカードスロットを配線しました。ESP32には,SPIとしてVSPIとHSPIがあり,この2つのSPIを使いました。
次の図のように,液晶ディスプレイとタッチパネルにはVSPIを使用し,CS信号ででいずれかを切り替えます。マイクロSDはHSPIとしました。
ESP32との接続
・液晶ディスプレイ:VSPI(SCK,MISO,MOSI,CS,DC) = (18,29,23,5,32)
・タッチパネル:VSPI (SCK,MISO,MOSI,CS) = (18,19,23,4)
(SCK,MISO,MOSIは,液晶ディスプレイと共通,チップセレクトCS(4,5)で切り替え)
・マイクロSDカードスロット:HSPI(SCK,MISO,MOSI,SS) = (14,33,13,15)
(HSPIのデフォルト12ピンは,MISOとして使用不可,SDカードモジュールにてプルアップされているため。)
※ SPIのバスクロック(SCK)は27Mhzと速いため「ブレッドボード」での検証では上記の配線でうまく動作しませんでした。ジャンパ線を工夫して最短で接続すると動作するかもしれませんが未検証です。
プログラム(液晶ディスプレイとタッチパネル)
TFT_eSPIライブラリを使うと,簡単に液晶ディスプレイとタッチパネルの動作確認ができます。
ライブラリ:TFT_eSPI
スケッチ例→TFT_eSPI -> 320 x 240 -> Keypad 240×320
1. ユーザ設定ファイルの変更(重要)
使用する液晶ディスプレイに合わせてユーザ設定ファイルを変更します。
・ドキュメント/Arduino/libraries/TFT_eSPI/UserSetup.h
ESP32の液晶ディスプレイ,タッチパネルの配線に合わせて,次の箇所を変更します。
#define ILI9341_DRIVER

#define TFT_MISO 19
#define TFT_MOSI 23
#define TFT_SCLK 18
#define TFT_CS    5 // Chip select control pin
#define TFT_DC    32  // Data Command control pin
#define TFT_RST  -1  // Set TFT_RST to -1 if display RESET is connected to ESP32 board RST

#define TOUCH_CS 4     // Chip select pin (T_CS) of touch screen
2. Arduino:ファイル→スイッチ例→TFT_eSPI→320×240→Keypad_240x320
サンプルのプログラムを実行すると,
・タッチパネルの「キャリブレーション」が実行されます。
液晶ディスプレイのコーナー(4カ所)をタッチペンで押していきます。
・電卓のプログラムが始まります。
// Keypad_240x320.ino
#include "FS.h"

#include <SPI.h>
#include <TFT_eSPI.h>      // Hardware-specific library

TFT_eSPI tft = TFT_eSPI(); // Invoke custom library

// This is the file name used to store the calibration data
// You can change this to create new calibration files.
// The SPIFFS file name must start with "/".
#define CALIBRATION_FILE "/TouchCalData1"

// Set REPEAT_CAL to true instead of false to run calibration
// again, otherwise it will only be done once.
// Repeat calibration if you change the screen rotation.
#define REPEAT_CAL false

// Keypad start position, key sizes and spacing
#define KEY_X 40 // Centre of key
#define KEY_Y 96
#define KEY_W 62 // Width and height
                                                                                                                                                                                                                                                                                                                                                                                                                                                                                                                                                                                                                                                                                                         #define KEY_H 30
#define KEY_SPACING_X 18 // X and Y gap
#define KEY_SPACING_Y 20
#define KEY_TEXTSIZE 1   // Font size multiplier

// Using two fonts since numbers are nice when bold
#define LABEL1_FONT &FreeSansOblique12pt7b // Key label font 1
#define LABEL2_FONT &FreeSansBold12pt7b    // Key label font 2

// Numeric display box size and location
#define DISP_X 1
#define DISP_Y 10
#define DISP_W 238
#define DISP_H 50
#define DISP_TSIZE 3
#define DISP_TCOLOR TFT_CYAN

// Number length, buffer for storing it and character index
#define NUM_LEN 12
char numberBuffer[NUM_LEN + 1] = "";
uint8_t numberIndex = 0;

// We have a status line for messages
#define STATUS_X 120 // Centred on this
#define STATUS_Y 65

// Create 15 keys for the keypad
char keyLabel[15][5] = {"New", "Del", "Send", "1", "2", "3", "4", "5", "6", "7", "8", "9", ".", "0", "#" };
uint16_t keyColor[15] = {TFT_RED, TFT_DARKGREY, TFT_DARKGREEN,
                         TFT_BLUE, TFT_BLUE, TFT_BLUE,
                         TFT_BLUE, TFT_BLUE, TFT_BLUE,
                         TFT_BLUE, TFT_BLUE, TFT_BLUE,
                         TFT_BLUE, TFT_BLUE, TFT_BLUE
                        };

// Invoke the TFT_eSPI button class and create all the button objects
TFT_eSPI_Button key[15];

//------------------------------------------------------------------------------------------

void setup() {
  // Use serial port
  Serial.begin(9600);

  // Initialise the TFT screen
  tft.init();

  // Set the rotation before we calibrate
  tft.setRotation(0);

  // Calibrate the touch screen and retrieve the scaling factors
  touch_calibrate();

  // Clear the screen
  tft.fillScreen(TFT_BLACK);

  // Draw keypad background
  tft.fillRect(0, 0, 240, 320, TFT_DARKGREY);

  // Draw number display area and frame
  tft.fillRect(DISP_X, DISP_Y, DISP_W, DISP_H, TFT_BLACK);
  tft.drawRect(DISP_X, DISP_Y, DISP_W, DISP_H, TFT_WHITE);

  // Draw keypad
  drawKeypad();
}

//------------------------------------------------------------------------------------------

void loop(void) {
  uint16_t t_x = 0, t_y = 0; // To store the touch coordinates

  // Pressed will be set true is there is a valid touch on the screen
  boolean pressed = tft.getTouch(&t_x, &t_y);

  // / Check if any key coordinate boxes contain the touch coordinates
  for (uint8_t b = 0; b < 15; b++) {
    if (pressed && key[b].contains(t_x, t_y)) {
      key[b].press(true);  // tell the button it is pressed
    } else {
      key[b].press(false);  // tell the button it is NOT pressed
    }
  }

  // Check if any key has changed state
  for (uint8_t b = 0; b < 15; b++) {

    if (b < 3) tft.setFreeFont(LABEL1_FONT);
    else tft.setFreeFont(LABEL2_FONT);

    if (key[b].justReleased()) key[b].drawButton();     // draw normal

    if (key[b].justPressed()) {
      key[b].drawButton(true);  // draw invert

      // if a numberpad button, append the relevant # to the numberBuffer
      if (b >= 3) {
        if (numberIndex < NUM_LEN) {
          numberBuffer[numberIndex] = keyLabel[b][0];
          numberIndex++;
          numberBuffer[numberIndex] = 0; // zero terminate
        }
        status(""); // Clear the old status
      }

      // Del button, so delete last char
      if (b == 1) {
        numberBuffer[numberIndex] = 0;
        if (numberIndex > 0) {
          numberIndex--;
          numberBuffer[numberIndex] = 0;//' ';
        }
        status(""); // Clear the old status
      }

      if (b == 2) {
        status("Sent value to serial port");
        Serial.println(numberBuffer);
      }
      // we dont really check that the text field makes sense
      // just try to call
      if (b == 0) {
        status("Value cleared");
        numberIndex = 0; // Reset index to 0
        numberBuffer[numberIndex] = 0; // Place null in buffer
      }

      // Update the number display field
      tft.setTextDatum(TL_DATUM);        // Use top left corner as text coord datum
      tft.setFreeFont(&FreeSans18pt7b);  // Choose a nicefont that fits box
      tft.setTextColor(DISP_TCOLOR);     // Set the font colour

      // Draw the string, the value returned is the width in pixels
      int xwidth = tft.drawString(numberBuffer, DISP_X + 4, DISP_Y + 12);

      // Now cover up the rest of the line up by drawing a black rectangle.  No flicker this way
      // but it will not work with italic or oblique fonts due to character overlap.
      tft.fillRect(DISP_X + 4 + xwidth, DISP_Y + 1, DISP_W - xwidth - 5, DISP_H - 2, TFT_BLACK);

      delay(10); // UI debouncing
    }
  }
}

//------------------------------------------------------------------------------------------

void drawKeypad()
{
  // Draw the keys
  for (uint8_t row = 0; row < 5; row++) {
    for (uint8_t col = 0; col < 3; col++) {
      uint8_t b = col + row * 3;

      if (b < 3) tft.setFreeFont(LABEL1_FONT);
      else tft.setFreeFont(LABEL2_FONT);

      key[b].initButton(&tft, KEY_X + col * (KEY_W + KEY_SPACING_X),
                        KEY_Y + row * (KEY_H + KEY_SPACING_Y), // x, y, w, h, outline, fill, text
                        KEY_W, KEY_H, TFT_WHITE, keyColor[b], TFT_WHITE,
                        keyLabel[b], KEY_TEXTSIZE);
      key[b].drawButton();
    }
  }
}

//------------------------------------------------------------------------------------------

void touch_calibrate()
{
  uint16_t calData[5];
  uint8_t calDataOK = 0;

  // check file system exists
  if (!SPIFFS.begin()) {
    Serial.println("Formating file system");
    SPIFFS.format();
    SPIFFS.begin();
  }

  // check if calibration file exists and size is correct
  if (SPIFFS.exists(CALIBRATION_FILE)) {
    if (REPEAT_CAL)
    {
      // Delete if we want to re-calibrate
      SPIFFS.remove(CALIBRATION_FILE);
    }
    else
    {
      File f = SPIFFS.open(CALIBRATION_FILE, "r");
      if (f) {
        if (f.readBytes((char *)calData, 14) == 14)
          calDataOK = 1;
        f.close();
      }
    }
  }

  if (calDataOK && !REPEAT_CAL) {
    // calibration data valid
    tft.setTouch(calData);
  } else {
    // data not valid so recalibrate
    tft.fillScreen(TFT_BLACK);
    tft.setCursor(20, 0);
    tft.setTextFont(2);
    tft.setTextSize(1);
    tft.setTextColor(TFT_WHITE, TFT_BLACK);

    tft.println("Touch corners as indicated");

    tft.setTextFont(1);
    tft.println();

    if (REPEAT_CAL) {
      tft.setTextColor(TFT_RED, TFT_BLACK);
      tft.println("Set REPEAT_CAL to false to stop this running again!");
    }

    tft.calibrateTouch(calData, TFT_MAGENTA, TFT_BLACK, 15);

    tft.setTextColor(TFT_GREEN, TFT_BLACK);
    tft.println("Calibration complete!");

    // store data
    File f = SPIFFS.open(CALIBRATION_FILE, "w");
    if (f) {
      f.write((const unsigned char *)calData, 14);
      f.close();
    }
  }
}

//------------------------------------------------------------------------------------------

// Print something in the mini status bar
void status(const char *msg) {
  tft.setTextPadding(240);
  //tft.setCursor(STATUS_X, STATUS_Y);
  tft.setTextColor(TFT_WHITE, TFT_DARKGREY);
  tft.setTextFont(0);
  tft.setTextDatum(TC_DATUM);
  tft.setTextSize(1);
  tft.drawString(msg, STATUS_X, STATUS_Y);
}

//------------------------------------------------------------------------------------------
プログラム(SDカード)
SDカードの接続には,HSPIを使用しています。SDライブラリは,VSPIの使用を想定しているため,少しコードの修正が必要です。次のコードの太文字部分を書き換えると,SDカードが使用できます。これで,液晶ディスプレイ・タッチパネルとSDカードを同時に使うことができます。
#include <SD.h>

SPIClass spiSD(HSPI);
#define SD_SCK  14
#define SD_MISO 33
#define SD_MOSI 13
#define SD_SS   15

char logFile[32] = "/20210315_1418.txt";
File dataFile;

void setup() {
  Serial.begin(115200);
  Serial.print("Initializing SD card...");
  spiSD.begin(SD_SCK, SD_MISO, SD_MOSI, SD_SS); //SCK,MISO,MOSI,SS //HSPI1

  if (!SD.begin(SD_SS, spiSD)) {
    Serial.println("Card Mount Failed");
    return;
  }

  dataFile = SD.open(logFile, FILE_WRITE);
  dataFile.println("date,elapse,pitch,xAccel,yAccel,zAccel,xGyro,yGyro,zGyro");
  dataFile.close();
  Serial.println("done");
}

void loop() {
}
まとめ
ESP32で,液晶ディスプレイ・タッチパネルとSDカードを使用する方法を示しました。講座では,液晶ディスプレイをセンサで測定した情報の表示,グラフの描画,画像の表示,タッチパネルの入力などに使います。


コメント